Initial Setup
- Unfold the rear stand of the monitor.
- Remove battery cover and insert 3 “AAA” batteries. Once the batteries are inserted, you have 3 minutes to complete steps 3 and 4. Don’t worry if you run out of time. It’s easy to start over!
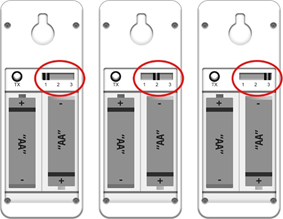
- Remove back cover of each white remote transmitter.
- Confirm each remote sensor is set to a different channel (1, 2 or 3), then install 2 “AA” batteries into each transmitter.
- Once the batteries are inserted into the remote transmitters, the red light will turn on. Once the red light disappears, the temperature and humidity reading of that transmitter will be displayed on the monitor.
- (Optional) Plug the AC adapter into the right side of the monitor and receptacle outlet.
- Use the UP button to toggle between your desired unit of temperature (°F or °C).
Installation Video
![]()
Minder Division of Valterra Products
3000 SE Waaler Street
Stuart, FL 34997
Was this article helpful?
That’s Great!
Thank you for your feedback
Sorry! We couldn't be helpful
Thank you for your feedback
Feedback sent
We appreciate your effort and will try to fix the article